Server-Sent Events (SSE) Implementation
Server-Sent Events (SSE) enable the backend to push real-time updates to the frontend without the need for constant requests (polling).
Traditionally, web pages must continuously send requests to the server to check for updates (polling). This results in repeated requests and unnecessary network traffic. Instead, SSE enables the server to push updates only when new data is available, making it a more efficient solution.
SSE uses the Server-Push Model where the client opens a single connection, and the server pushes updates whenever new data is available.
SSE Workflow
- The frontend (client) connects to the SSE endpoint (
/events). - The server keeps the connection open and pushes events whenever there is new data.
- The client listens for these events and updates the UI accordingly.
[Client] → Opens Connection → [Server]
                      ← New Data! ←
                      ← New Data! ←
                      ← New Data! ←
Key SSE Characteristics
-One-Way Communication: The server can send events to the client, but the client cannot send events back over the same connection.
- Efficient & Lightweight: Uses a single persistent HTTP connection, reducing unnecessary network traffic.
- Automatic Reconnection: If the connection is lost, the browser can automatically reconnect.
Backend Implementation (Node.js + Express)
1️. Setting Up an Event Emitter (Global Event Handler)
The event emitter is used to manage real-time events across the system.
File: src/events/eventEmitter.js
const EventEmitter = require("events");

// Create a single instance of EventEmitter
const eventEmitter = new EventEmitter();

module.exports = eventEmitter;
- This singleton instance ensures all events are handled globally.
2️. SSE Endpoint to Handle Client Connections
File: src/routes/common.js
const express = require("express");
const router = express.Router();
const clients = new Set();
const eventsEmitter = require("../events/eventEmitter");

router.get("/events", (req, res) => {
  res.setHeader("Content-Type", "text/event-stream");
  res.setHeader("Cache-Control", "no-cache");
  res.setHeader("Connection", "keep-alive");
  res.setHeader("Transfer-Encoding", "chunked");
  res.setHeader("Access-Control-Allow-Origin", "*");
  res.setHeader("Content-Encoding", "none");
  res.flushHeaders();

  // Add client to the list
  clients.add(res);
  console.log(`New client connected. Total clients: ${clients.size}`);

  // Initial connection message
  res.write(
    `data: ${JSON.stringify({
      type: "newMessage",
      data: "Connected to SSE",
    })}\n\n`
  );
  if (res.flush) res.flush();

  // Send a heartbeat to keep connection alive
  const heartbeat = setInterval(() => {
    res.write("data: {}\n\n");
  }, 30000);

  // Handle client disconnect
  req.on("close", () => {
    clearInterval(heartbeat);
    clients.delete(res);
    console.log(`Client disconnected. Remaining clients: ${clients.size}`);
  });
});

// Function to broadcast messages to all connected clients
const broadcastEvent = (eventType, data) => {
  clients.forEach((client) => {
    client.write(`data: ${JSON.stringify({ type: eventType, data })}\n\n`);
    if (client.flush) client.flush();
  });
};

// Event Listeners for Real-Time Updates
eventsEmitter.on("newMessage", (message) => {
  broadcastEvent("newMessage", message);
  console.log("\x1b[32m Sent default message \x1b[0m");
});

eventsEmitter.on("waitlist", (payload) => {
  broadcastEvent("waitlist", payload);
  console.log("\x1b[32m Sent waitlist update \x1b[0m");
});

eventsEmitter.on("availability", (payload) => {
  broadcastEvent("availability", payload);
  console.log("\x1b[32m Sent availability update \x1b[0m");
});

module.exports = router;
- Here 3 events are defined, more can be added based on need.
- The backend currently emits three events:
-
newMessage: Used for basic connection messages.
-
waitlist: Triggered when a patient is added to the waitlist.
-
availability: Triggered when provider availability changes.
- More events can be added based on system requirements.
3️. Triggering Events in the Backend (Emitting SSE Events)
In order to send real-time updates to the frontend, the backend triggers events using the global eventsEmitter.
Example: Emitting an Event When a Patient is Added to the Waitlist
File: src/controllers/waitlist/WaitlistController.js
const eventsEmitter = require("../../events/eventEmitter");

const addWaitlist = asyncHandler(async (req, res) => {
  // Business logic to add a patient to the waitlist...

  // 🔹 Trigger a "waitlist" event when a patient is added
  eventsEmitter.emit("waitlist", "Add Patient to Waitlist");

  return res.status(200).json({
    message: "Patient added to Waitlist successfully!",
    data: waitlist,
  });
});
How It Works
- A request is made to add a patient to the waitlist
- The backend processes the request, validates the data, and updates the database.
- An event is emitted using
eventsEmitter.emit()- The event type (
'waitlist') tells the system that a waitlist update has occurred. - The payload (
'Add Patient to Waitlist') provides data for the frontend.
- The event type (
- The SSE event handler listens for emitted events and broadcasts them to all connected clients.
- All connected clients (subscribed via
/events) receive the update immediately.
- All connected clients (subscribed via
What is Emitted to the Frontend?
When eventsEmitter.emit('waitlist', 'Add Patient to Waitlist') is called, the SSE endpoint (/events) sends this real-time event to all clients:
data: {"type": "waitlist", "data": "Add Patient to Waitlist"}
Frontend Implementation (React + Next.js)
- In the frontend, we use a custom
useSSEReact Hook to listen for updates. - This ensures that the UI dynamically updates when new events are pushed from the server.
1️. The SSE Hook
File: hooks/useSSE.ts
import { useEffect, useCallback } from "react";

const useSSE = (url: string, onEvent: (type: string, data: any) => void) => {
  const stableOnEvent = useCallback(onEvent, []);

  useEffect(() => {
    let eventSource = new EventSource(url);

    eventSource.onmessage = (event: MessageEvent) => {
      try {
        const sseData = JSON.parse(event.data);
        if (sseData.type && sseData.data) {
          stableOnEvent(sseData.type, sseData.data);
        }
      } catch (error) {
        console.error("Error parsing SSE data:", error);
      }
    };

    eventSource.onerror = () => {
      console.warn("SSE connection lost. Reconnecting in 5 seconds...");
      eventSource.close();
      setTimeout(() => {
        eventSource = new EventSource(url);
      }, 5000);
    };

    window.addEventListener("beforeunload", () => eventSource.close());

    return () => {
      eventSource.close();
      window.removeEventListener("beforeunload", () => eventSource.close());
    };
  }, [url, stableOnEvent]);
};

export default useSSE;
2️. Using SSE in the Waitlist Page
File: bizapp/src/pages/waitlist/[providerId]/index.tsx
import useSSE from "alethian-app/hooks/useSSE";

useSSE(`${getBaseUrl()}events`, (type: string, data: any) => {
  switch (type) {
    case "waitlist":    //If type is waitlist, // Refresh waitlist data and UI
      providersWaitlistRefetch();
      break;
    case "availability":
    ... // tasks
      break;
    default:
      break;
  }
});
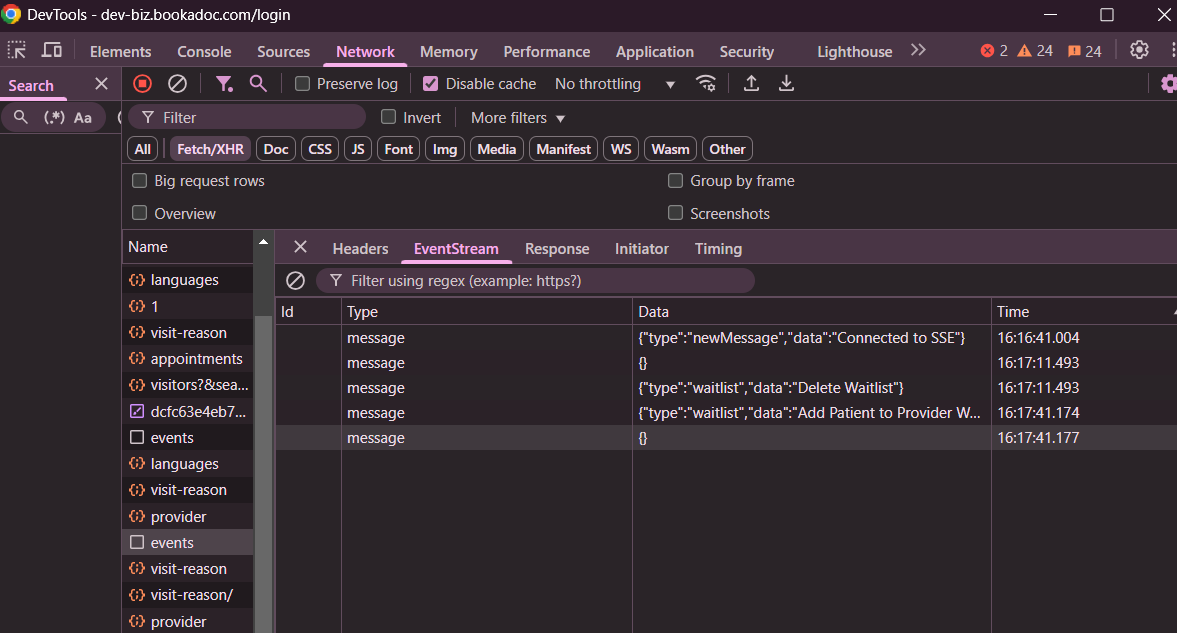
3️. Viewing SSE in Dev-tools
NGINX Configuration
The NGINX server hosting the backend code needs some configuration for SSE to be enabled. This is the current configuration being implemented:
	location /api/v1/events {
		proxy_set_header Host $http_host;
	        proxy_pass http://localhost:8080;

		proxy_set_header Connection '';
		proxy_http_version 1.1;
		chunked_transfer_encoding off;
		proxy_buffering off;
		proxy_cache off;
	}